ES6-解構賦值(Destructuring Assignment)

解構賦值(Destructuring Assignment)

基本說明

簡單來說,可以想像是鏡子的概念,將右方的資料往左邊送,然後會一個位置對一個值。

  • 陣列 ==對應=> 順序的索引值
  • 物件 ==對應=> 物件的屬性名稱

陣列解構賦值

基本用法

新舊寫法
1
2
3
4
5
6
7
8
9
10
//ES5
let numbers = [1, 2, 3];
let a = numbers[0];
let b = numbers[1];
let c = numbers[2];
console.log(a, b, c); // 1, 2, 3

//ES6
let [a, b, c] = [1, 2, 3];
console.log(a, b, c); // 1, 2, 3

陣列各種情境

變數的數量多於賦予的時,多出來的那個變數會被賦予 undefined 的值(d = undefined):

變數 多於 所給的值
1
2
3
// 變數 多於 所給的值
let [a, b, c, d] = [1, 2, 3];
console.log(a, b, c, d); // 1, 2, 3, undefined

當輸入的變數少於所給的的時候,只有被指定到的變數會有值,少掉的變數可以直接空過去:

當變數 少於 所給的值
1
2
3
4
// 當變數 少於 所給的值
let [a, , c] = [1, 2, 3];

console.log(a, c); // 1, 3

至於陣例傳值是有順序性,在這個範例中直接將右邊的變數交換到左邊,可以看到是同時交換變數,所以在互換變數值時是非常方便的。

交換值
1
2
3
4
// 交換值
const a = 1,
b = 2;
[b, a] = [a, b]; //a=2, b=1

遇到字串則會將字串拆解成一個一個字元,賦予到左方的變數上。

字串
1
2
let str = 'kanboo';
[a, b, c, d, e, f] = str;

另外也可以運用 ES6 的其餘參數 ,可以看到有個 ...other 的用法 ,這是可以將剩餘的陣列成員通通塞給 other 這個變數,如果沒有相對應的值則這個變數的值會是undefined,

其餘參數
1
2
3
4
5
6
7
8
let [one, ...other] = [1, 2, 3, 4];
console.log(one); // 1
console.log(other); // [2, 3, 4]

let [a, b, ...z] = ['a'];
console.log(a); // 'a'
console.log(b); // undefined
console.log(z); // []

物件解構賦值

陣列是使用順序的索引值對應,但物件則是使用物件的屬性名稱來做對應(因此沒有順序性)。

在以下範例則是快速將物件值解構在變數上。

1
2
3
4
5
6
7
// 基本用法
const { user, admin } = { user: '平民', admin: '皇帝' };
console.log(user, admin); //"平民","皇帝"

// 屬性名稱對換位置也不影響
const { admin, user } = { user: '平民', admin: '皇帝' };
console.log(admin, user); //"皇帝", "平民"

如果變數與屬性名都沒有對應的名稱,則變數的值會是 undefined

1
2
3
// 沒有對應的屬性
const { user } = { admin: '皇帝' };
console.log(user); //undefined

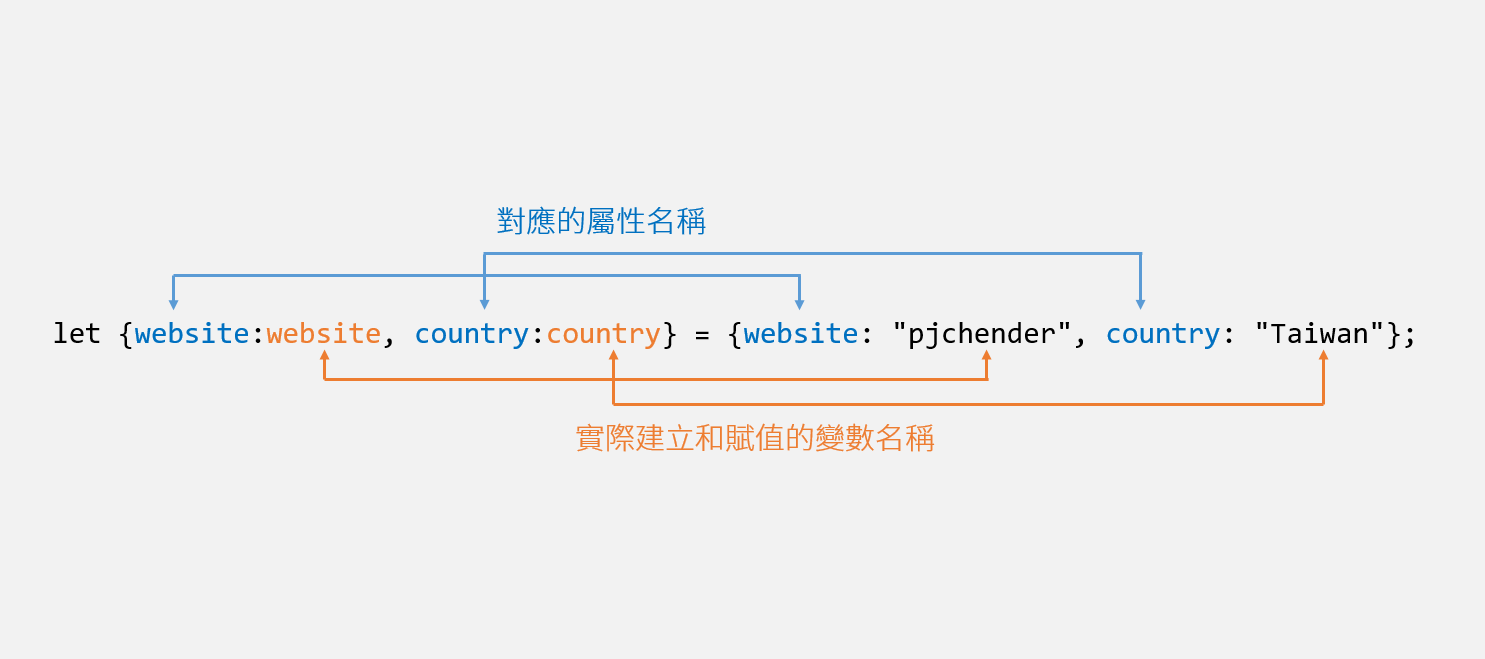
而物件的解構方法,還能重新賦予變數的名稱,也可以屬性值來當作變數對應等號後方的屬性值,寫法會是類似這樣:

1
2
const { user: aa, admin: zz } = { user: '平民', admin: '皇帝' };
console.log(aa, zz); //"平民","皇帝"

不可行的寫法

陣列解構賦值不同的是,在陣列解構賦值中,我們可以接受 「變數 少於 所給的值 」:

陣列
1
2
let [a, , c] = [1, 2, 3];
console.log(a, c); // 1, 3

但是在物件解構賦值中,我們不能像上面這樣寫:

物件
1
2
let{a, ,c} = {a:1, b:2, c:3};
console.log(a,c); // Error

只能接受 「變數 多於 所給的值 」

物件
1
2
let { a, b, c, d } = { a: 1, c: 3 };
console.log(a, b, c, d); // 1, undefined, 3, undefined

物件解構賦值的用途

物件解構賦值的用途相當多,其中在提取 JSON 數據時相當方便:

JSON
1
2
3
4
5
6
7
8
9
10
11
let ajax_JSON = {
id: 9527,
name: 'Kanboo',
other: {
tel: '1234567',
fax: '7654321'
}
};

let { id, name, other } = ajax_JSON;
console.log(id, name, other); // 9527 "Kanboo" {tel: "1234567", fax: "7654321"}

延伸上例,若我只想取得 other 裡的「電話 tel」,取得方式,如下例

JSON
1
2
3
4
5
6
7
8
9
10
11
12
13
14
15
16
let ajax_JSON = {
id: 9527,
name: 'Kanboo',
other: {
tel: '1234567',
fax: '7654321'
}
};

let {
id,
name,
other: { tel }
} = ajax_JSON;

console.log(id, name, tel); // 9527 "Kanboo" "1234567"

如此就能夠快速取得 JSON 物件的屬性名和屬性值。

混合使用

複雜的物件或混合陣列到物件,如果你能記住之前說的鏡子樣式對映基本原則,其實也很容易就能理解

範例1
1
2
3
4
5
let {
home: Master,
family: [, member]
} = { home: '媽媽', family: ['老大', '老二', '老么'] };
console.log(Master, member); // 媽媽 老二
範例2
1
2
3
4
5
6
7
8
9
10
11
// 複雜多層次的物件
const {
prop: x,
prop2: {
prop3: {
nested: [, , b]
}
}
} = { prop: 'Hello', prop2: { prop3: { nested: ['a', 'b', 'c'] } } };

console.log(x, b); // => Hello c

預設值

除了使用鏡射的概念外,為了避免值沒有賦予造成 undefined,可以使用預設值避免此問題。

如以下左方的陣列都先賦予的預設值,當右方的陣列只有一個值時,左方的陣列剩餘內容將會採用預設值。

1
2
3
4
5
6
7
8
const [isPass = true] = [];
console.log(isPass); // true

const { message: msg = 'Hello' } = {};
console.log(msg); // "Hello"

const { a = 6 } = {};
console.log(a); // 6

要作一個簡單的陷阱題滿簡單的,你可以試看看下面這個範例中到底是賦到了什麼值:

1
2
3
4
const { a = 'kanboo' } = 'hello';
const [b = 'kanboo'] = 'hello';

console.log(a, b);

函式

除了以上的方法外,解構也能使用在函式的參數,使用方式如同將傳入的物件對應到函式參數上。
這樣參數一樣能夠能夠自訂變數名稱、順序、預設值等。

1
2
3
4
5
6
7
8
9
function func({ a = 3, b }) {
console.log(a + b);
}

func({ a: 1, b: 2 }); // 3
func({ b: 2 }); // 5
func({ a: 1 }); // NaN
func({}); // NaN
func(); // Cannot read property 'a' of undefined

當 a 與 b 兩個都有預設值時,NaN 的情況不存在:

1
2
3
4
5
6
7
8
9
function func({ a = 3, b = 5 }) {
console.log(a + b);
}

func({ a: 1, b: 2 }); // 3
func({ a: 1 }); // 6
func({ b: 2 }); // 5
func({}); // 8
func(); // Cannot read property 'a' of undefined

實際上函式傳入參數它自己也可以加預設值,但這情況會讓最後一種 func() 呼叫時與 func({}) 相同結果:

1
2
3
4
5
6
7
8
9
function func({ a = 3, b = 5 } = {}) {
console.log(a + b);
}

func({ a: 1, b: 2 }); // 3
func({ a: 1 }); // 6
func({ b: 2 }); // 5
func({}); // 8
func(); // 8

另一種情況是在函式傳入參數的預設值中給了另一套預設值,這只會在 func()時發揮它的作用:

1
2
3
4
5
6
7
8
9
function func({ a = 3, b = 5 } = { a: 7, b: 11 }) {
console.log(a + b);
}

func({ a: 1, b: 2 }); // 3
func({ a: 1 }); // 6
func({ b: 2 }); // 5
func({}); // 8
func(); // 18

參考來源