JS30-26-Stripe-Follow-Along-Nav

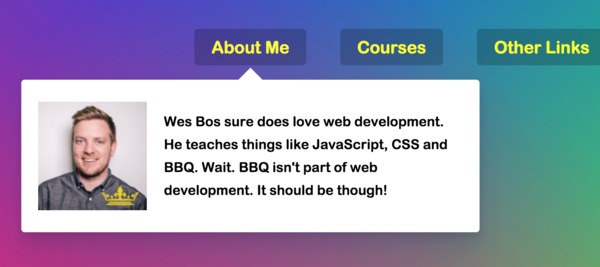
navbar次導覽列的動態效果

目標

  • navbar次導覽列的動態效果。

成品

[DEMO] | [GitHub]


開發建議作法

  1. 先建置 HTML架構
  2. 新增CSS及特殊效果,可利用Chrome開發工具,測試CSS效果大致上沒問題後。
  3. 再開始用JS處理 新增、移除、微調 CSS的部份。

學習紀錄

一、準備好HTML架構及CSS效果

HTML架構
1
2
3
4
5
6
7
8
9
10
11
12
13
14
15
16
17
18
19
20
21
22
23
24
25
26
27
28
29
30
<!-- Navbar -->
<nav class="top">

<!-- 下拉選單背景,到時用JS控制 大小、定位顯示 -->
<div class="dropdownBackground">
<span class="arrow"></span>
</div>

<!-- 選單 -->
<ul class="cool">
<li>
<a href="#">About Me</a>
<div class="dropdown dropdown1">
<!-- 下拉選單內容 -->
</div>
</li>
<li>
<a href="#">Courses</a>
<ul class="dropdown courses">
<!-- 下拉選單內容 -->
</ul>
</li>
<li>
<a href="#">Other Links</a>
<ul class="dropdown dropdown3">
<!-- 下拉選單內容 -->
</ul>
</li>
</ul>
</nav>
準備好CSS顯示的部份
1
2
3
4
5
6
7
8
9
10
11
12
13
14
/* 將 下拉選單內容 顯示 */
.trigger-enter .dropdown {
display: block;
}

/* 將 下拉選單內容 透明度改1 */
.trigger-enter-active .dropdown {
opacity: 1;
}

/* 將 下拉選單背景 透明度改1 */
.dropdownBackground.open {
opacity: 1;
}

二、選單綁上監聽事件

主要的效果切換,就是在滑鼠的移入、移出這二個動作。

綁上監聽事件
1
2
3
4
5
6
7
8
9
10
11
12
13
14
15
16
17
const triggers = document.querySelectorAll('.cool > li'); // 選單
const background = document.querySelector('.dropdownBackground'); // 選單背景
const nav = document.querySelector('.top'); // navbar

// 滑鼠移入事件
function handleEnter() {
console.log('ENTER~~');
}

// 滑鼠移出事件
function handleLeave() {
console.log('Leave!!');
}

// 為每個選單綁上 滑鼠移入、移出 監聽事件
triggers.forEach(trigger => trigger.addEventListener('mouseenter', handleEnter));
triggers.forEach(trigger => trigger.addEventListener('mouseleave', handleLeave));

三、新增動態效果

滑鼠移入事件
1
2
3
4
5
6
7
8
9
10
11
12
13
14
15
16
17
18
19
20
21
22
23
24
25
26
27
28
29
30
31
32
33
34
35
36
37
38
39
40
// 滑鼠移入事件
function handleEnter() {
// console.log('ENTER~~');

// 將 下拉選單內容 顯示
this.classList.add('trigger-enter');

// 為了避免快速滑動導覽列產生錯亂,因此在 setTimeout 上增加判斷,
// 當滑鼠移入時,先檢查是否有 trigger-enter 的className,
// 若 有 的話,才新增 trigger-enter-active 的className,
// 若 無 的話,則只會一直顯示 白色選單背景 的部分,內容不會被顯示出來。
setTimeout(() => this.classList.contains('trigger-enter') && this.classList.add('trigger-enter-active'), 150);

// 新增 open class,配合 下拉選單背景 使用
background.classList.add('open');

// 取得目前滑入元素底下的 dropdown
const dropdown = this.querySelector('.dropdown');
// 取得 dropdown 的 大小、定位 資訊
const dropdownCoords = dropdown.getBoundingClientRect();
// 取得 navbar 的 大小、定位 資訊
const navCoords = nav.getBoundingClientRect();

// 設定 下拉選單背景 的 大小、定位
const coords = {
height: dropdownCoords.height,
width: dropdownCoords.width,
// 因為 getBoundingClientRect 是取得 目標元素相對於「瀏覽器視窗」的位置資訊,
// 而 transform的translate 是根據 「父元素」 來定位,
// 為了統一以「父元素」為基準點,
// 所以要扣掉 navbar 的定位,避免上方區塊增加時造成的錯位,
top: dropdownCoords.top - navCoords.top,
left: dropdownCoords.left - navCoords.left
};

// 設定 下拉選單背景 的 大小、定位
background.style.setProperty('width', `${coords.width}px`);
background.style.setProperty('height', `${coords.height}px`);
background.style.setProperty('transform', `translate(${coords.left}px, ${coords.top}px)`);
}
滑鼠移出事件
1
2
3
4
5
6
// 滑鼠移出事件
function handleLeave() {
// console.log('Leave!!');
this.classList.remove('trigger-enter', 'trigger-enter-active');
background.classList.remove('open');
}