整理 Vue.js Component 筆記
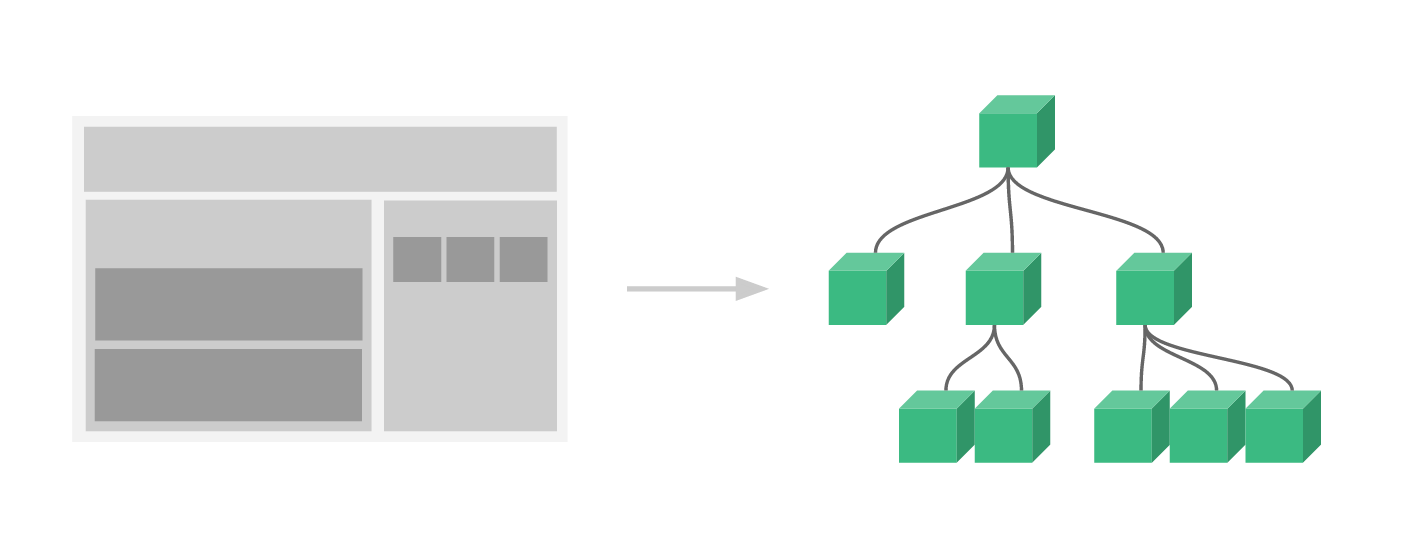
檔案命名規則
紀錄一些命名方式,詳細說明可看官方說明
緊密耦合的 Component
- 和父組件緊密耦合的子組件,應該以 父組件名稱 作為前綴。
官方:紧密耦合的组件名
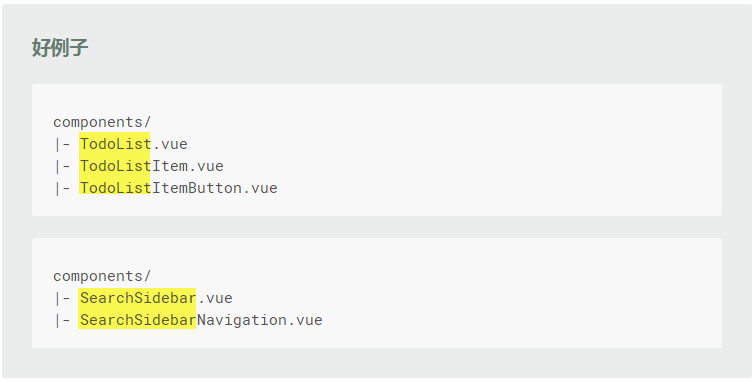
組件命名的順序
- 以概念上較普遍的單詞作為開頭,以描述性的修飾詞結尾。
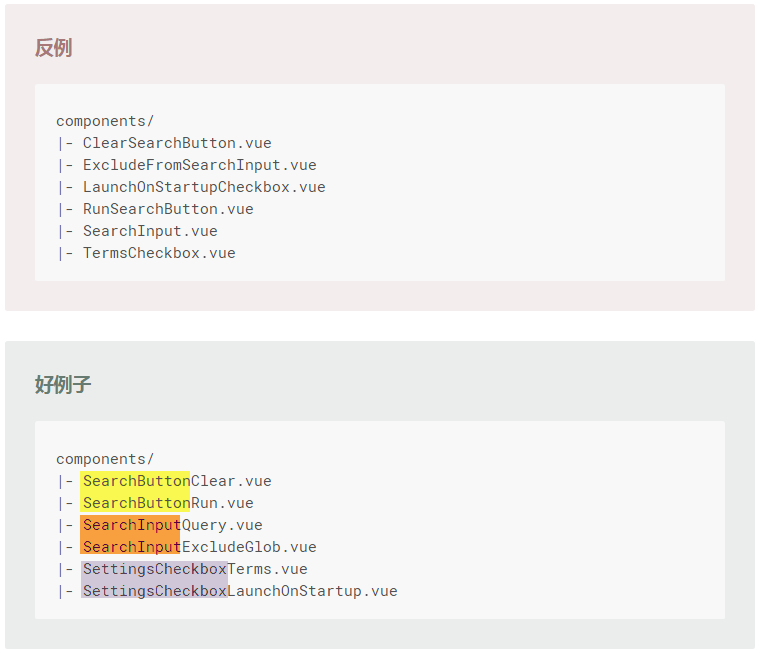
官方:组件名中的单词顺序
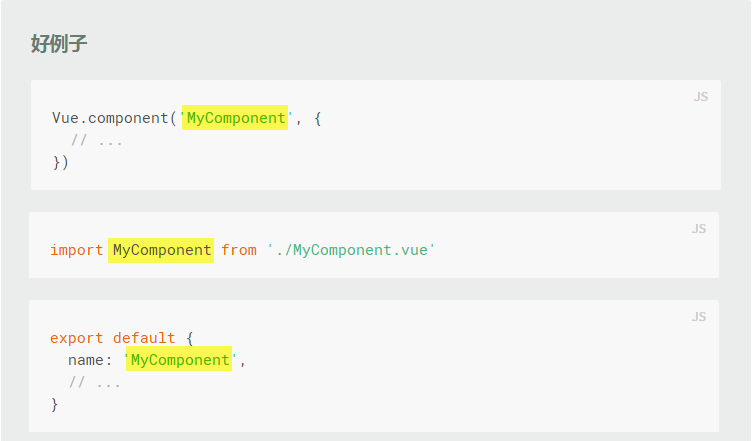
Component 命名與引用
使用單一檔案組件 (.vue)的話,不用多想,全部 PascalCase 就對了
需要使用 kebab-case 的情況只在你把 template 寫在 .html 裡面,
如此一來它會經 browser 解析,而 browser 是不分大小寫的,
所以才需要加 - 讓 Vue 知道大寫的轉換規則以找到組件。
FB 討論文:Vue 的元件命名建議
prop 命名
- 在 HTML 中,使用 kebab-case
- 在 JavaScript 中,使用 camelCase
官方:Prop-名大小写
props
資料傳遞過程
用下圖來表示外部資料傳入Vue.component的整個過程。
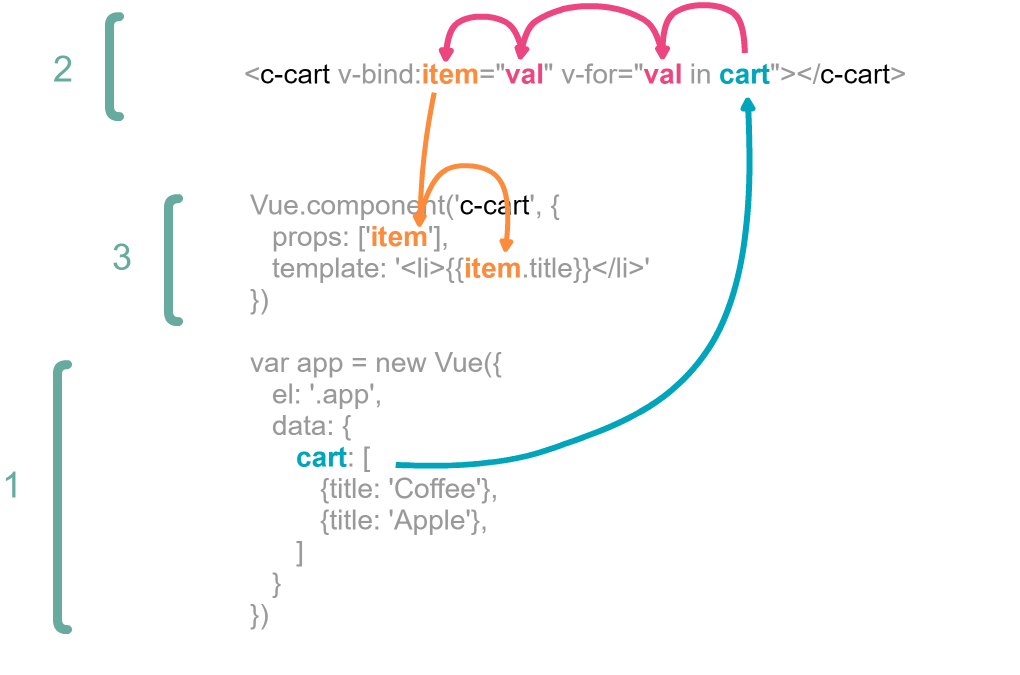
圖片來源:JSNWORK-Vue.component 組件教學
單向數據流
盡可能保持單向數據流的概念,就是讓資料是從 外層 → 內層 單方向傳遞。
AJAX 與 Component 的時間差
有時我們的資料可能是由 AJAX 的方式取得,如下例的 Vue 的 created ,
而當 component 要讀取父層的資料時,可能這時還沒有資料,
所以這時 component 直接讀取父層的 某個變數 資料時,但為空值而錯誤。
錯誤範例
開啟錯誤範例,看 console 出現的錯誤訊息。
1 | <div id="app"> |
錯誤範例:JSBin
修正版本
這時可以利用 v-if 來判斷,透過 AJAX 取得的資料是否已取得,
避免在父層資料還為空值時,就被讀取而錯誤。
1 | <div id="app"> |
正確範例:JSBin
定義盡可能詳細
養成好習慣,避免以後踩雷。
一般寫法
1 | <div id="app"> |
1 | Vue.component('PromptComponent', { |
程式範例:JSBin
嚴謹寫法
1 | <div id="app"> |
1 | Vue.component('MyComponent', { |
程式範例:JSBin
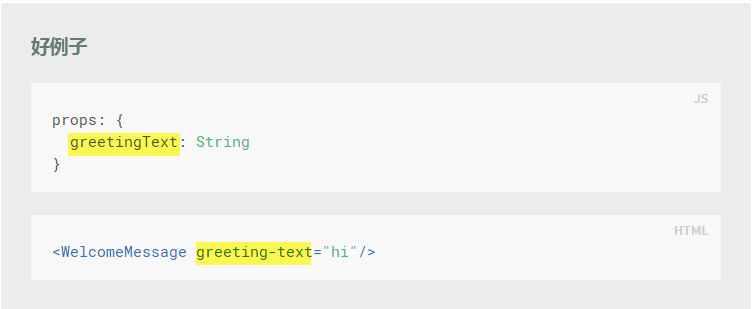
props 變數命名
當我們在 HTML 在 Component 裡,設定greeting-text屬性,
這樣在props要如何正確對應到正確的變數呢!
範例:
1 | <!-- HTML使用 kebab-case --> |
可看到下面有二種方式,
- 用雙引號包起來,這樣就跟在 HTML Component 的屬性名稱一樣
- 使用駝峰式 camelCase,來對應屬性名稱。
1 | Vue.component('TodoItem', { |
emit 向外層傳送事件
雖然我們要盡可能保持單向數據流的概念,就是讓資料是從 外層 → 內層 單方向傳遞,
不過有特殊情況的話,需要由 內層 去變動 外層 的值的話,
這時就需透過 $emit 傳遞事件方式,去觸發外層事件來更新變數值。

範例程式:透過 emit 向外傳遞資訊
Slot 插槽替換
簡單來說就是將我們的 component,修改為一個可客制化的 component。
以 DailogBox 為例,
我們每次使用都有可能因不同情況,而輸出不同的「標題、內文、按鈕」,
但我們的主體結構是長一樣的,這時就可以使用Slot來替換局部 HTML。
範例
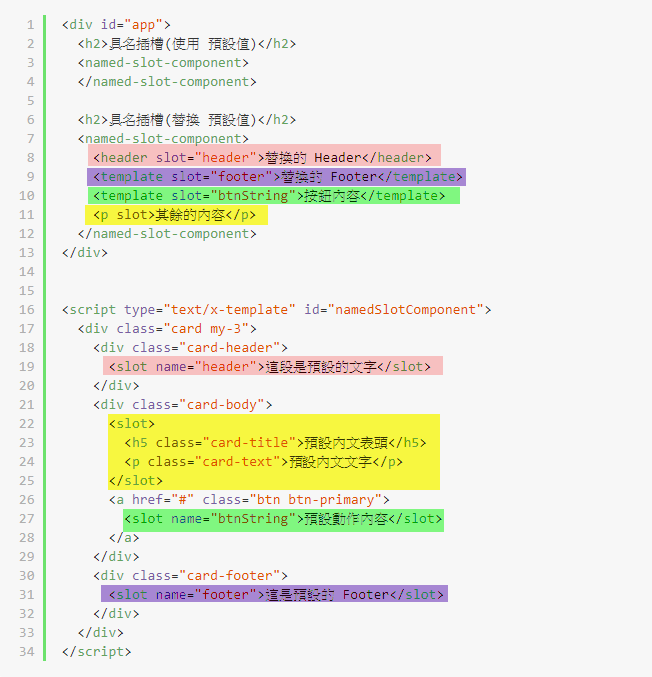
當有多個插槽時,我們就必須給予插槽名稱,才能正確替換局部 HTML。
原則上遵照下列幾點即可:
- 外層是在
Tag標籤,新增slot屬性,如:<header slot="header">替換的 Header</header> - 內層是在
slot標籤,新增name屬性,如:<slot name="header">這段是預設的文字</slot> - 若無設定
slot名稱的話,就會自己找洞插,不過一個洞就還好,多個的話,怕插錯洞。
1 | <div id="app"> |
加上顏色標籤,方便對應程式碼
使用 is 動態切換 Component
原先我們是使用 is 來決定要掛載哪一個 Component
1 | <!-- is 沒有冒號 --> |
不過有時可能要因應不同條件下,顯示不同的 Component,我們可能用 v-if 這樣寫去切換
1 | <!-- A情況 --> |
但可能有超過二種以上條件的話,程式碼就顯得雜亂,這時我們可以改寫用 變數 方式,並配合 is 的特性去做切換。
is 動態切換範例
注意行數
- 第 2 行:需使用
:is,而不是is,差在有沒有冒號。 - 第 23 行:用
current變數,來紀錄目前要使用哪個 Component
遵守上述二點,這時我們就可以在不同條件下,變更current的值,來切換不同 component。
1 | <!-- is 有冒號 --> |
Component 為何要用 return data
主要要說明 new Vue 的 data 及 Component 的 data,
一個是使用 {}(物件),一個卻要使用 return {}(物件),
這二者差異點是在哪裡!
修改前
當有重覆性的 Component 且會運用 變數 來紀錄的話,
有時很有可能會導致共用到同一個 變數 ,
而互相影響彼此的結果,就像下面的例子一樣,可以開啟CodePen,
分別 點擊 裡面的按鈕,看會出現什麼結果。
1 | <div id="app"> |
非 Component:CodePen
修改後
跟修改前,最大的差異就在於額外新增一段程式碼 Vue.component,
利用此功能達成 Component 化。
1 | <div id="app"> |
Component:CodePen
注意事項
不過使用 Vue.component 要特別注意一點,就是在 data 的宣告部份,
原本是使用 {}(物件) 的方式宣告,而在Vue.component的data一定要使用函式宣告,
並且 return {}(物件),否則無法正常執行。
1 | Vue.component('counter-component', { |
差異說明
Component 會採用 函式 return 值 的原因,是因為 Component 會一直被重覆建立,而每個 Component 的 data 必須有所區隔,利用此方式來建立不同記憶體位址的
{}(物件)new Vue 的 data 直接使用
{}(物件),也是因為只會只有一個,此 Vue 並不會被別人複製,所以就不會發生共用到同一個記憶體位址,而產生互改別人的資料的問題。