整理 Vue.js Router 筆記

路由設定
下面範例為簡單使用路由的起手式。
設定頁面路徑
1 | import Vue from 'vue'; |
切換頁面
1 | <template> |
轉址
假設一情況為 User 亂打網址時,找不到相對應的頁面時,
這時我們可以籍由「redirect 轉址」的方式,將頁面導向首頁。
範例
User 輸入的網址: serverPath/#/products
但並無 products 的頁面,所以這時會被導向 Home 首頁。
1 | export default new Router({ |
也可使用物件格式設定導向
1 | { |
別名
假設我們想要網址,不管是輸入「/about」或者「/story」時,
統一指向同一個頁面時,但是不更動網址列的「網址路徑」,
因為若使用「redirect 轉址」的話,就會被更動到「網址」。
範例
可注意下面參數裡,新增「alias」這個變數,
用來達成不管是輸入「/about」或者「/story」時,
都可以統一指向同一個頁面,但不更動到上方網址路徑的變化。
1 | export default new Router({ |
範例(多個別名)
別名只是個外號,所以同時存在多個別名,應該也合情合理,
而設定方式就是用陣列的型態,將多個別名放在一起。
1 | export default new Router({ |
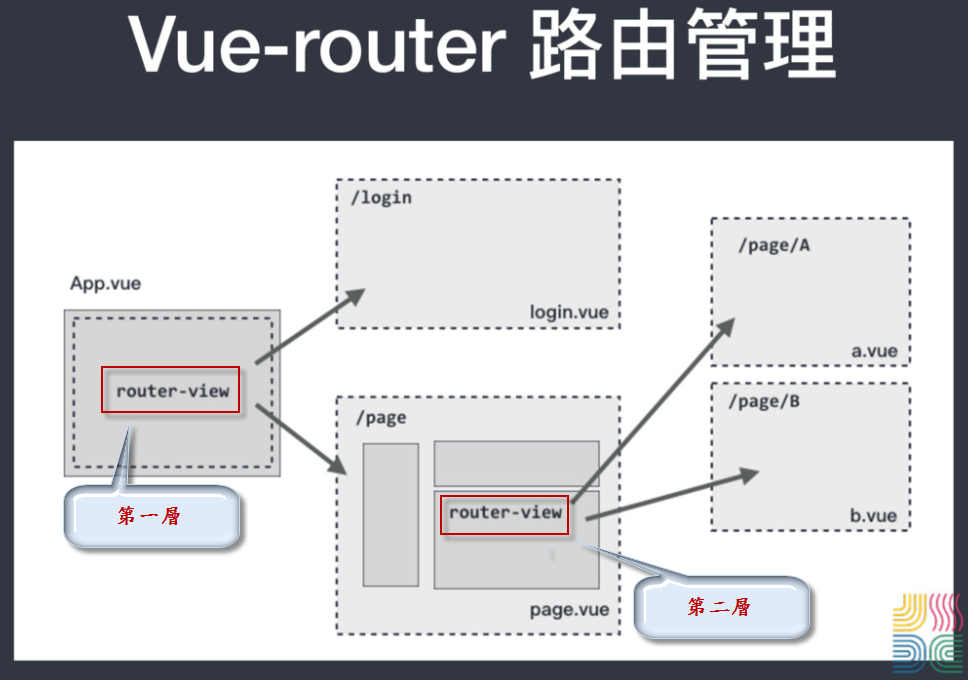
巢狀路由
籍由巢狀路由的設定,可以分不同區塊集中管理。
注意:如果巢狀有二層的話,就要有二個 <router-view/>
設定
設定頁面路徑
1 | <div id="app"> |
1 | <div class="admin"> |
1 | export default new Router({ |
根據上列程式,切換路由有下列幾種情況
- 網址:
/admin→ 會取得children底下的第一個子項 首頁(default)。 - 網址:
/admin/products→ 會取得children底下的第二個子項 產品列表。
切換頁面
1 | <template> |
範例
官方範例程式碼:JSFiddle
動態路由
當有一種情況是很多頁面,不過版型都一樣,只有資料面不一樣的話,
我們就可以利用動態 id的方式,透過 AJAX 取得資料,置換掉版型的內容,
這樣就只需產出一個Component元件就好。
1 | export default new Router({ |
而在 Vue 檔裡,可使用 this.$route.params`來取得值,
到時就可利用此 id 透過 ajax 取得資料,並且更新版型的內谷。
1 | created() { |
範例
| pattern | matched path | $route.params |
|---|---|---|
| /user/:username | /user/evan | { username: ‘evan’ } |
| /user/:username/post/:post_id | /user/evan/post/123 | { username: ‘evan’, post_id: 123 } |
官方範例程式碼:JSFiddle
當動態 id 可有可無時,如何設定
下列範例為我們有使用「動態路由」,去取得「產品 id」的值,
到時可籍由「產品 id」,去後端取得相對應的資料顯示於畫面。
範例
網址: serverPath/#/products/16
依上述網址,我們可以編號 16 號的產品資訊
1 | export default new Router({ |
1 | // 網址: serverPath/#/products/16 |
不過若當我們的動態 id 可有可無時,網址為下列情況的話
網址: serverPath/#/products
當無帶動態 id 的值時,會導致連預設「products 頁面」也不會顯示出來,
所以要避免這樣的情況發生的話,我們需在 router 的動態 id 後面,
新增一個「?」,這樣才能避免這預期顯示的畫面沒正確顯示。
1 | export default new Router({ |
同一路徑載入二個元件
可在一個頁面上同時載入多個元件的話,除了一個<router-view>是沒有命名,
其餘新增的 <router-view> 都需要額外新增 name 的屬性。
1 | <template> |
1 | // 載入頁面 |
路由的 CSS
當我們使用<router-link>在切換路由時,而<router-link>實際會轉換成 HTML 的<a>連結標籤,
所以當我們想針對目前點擊的<a>連結標籤做 CSS 效果時,可利用下列二個 CSS 的 class 名稱
linkActiveClass:預設頁面,符合此條件的<a>標籤,會有此 class。linkExactActiveClass:實際點擊<a>標籤後,會變成此 class。
自定義切換路由方法
可利用 Vue 的 methods,在動作觸發時,使用程式來切換路由。
router.push
這個方法會向history添加一個新的記錄,所以,當用戶點擊瀏覽器後退按鈕時,則回到之前的 URL。
1 | methods: { |
router.replace
跟router.push很像,唯一的不同就是,它不會向 history 添加新記錄,
而是跟它的方法名一樣,是 替換掉當前的 history 記錄。
其他 router
1 | // 在history記錄中向前或者後退多少步,類似window.history.go(n)。 |
在 Vue 實例内部,你可以通过
$router 访问路由实例,因此你可以调用 this.$router.push。Lazy Loading Routes
主要是設定Compnent時,採用 import('@/pages/Comics') 這樣的寫法的話,
會將各個頁面的 JS 拆分開來,而不是 build 專案時,只有一個一大包的 JS 檔,
如此一來的話,當 User 開啟某頁面時,才會載入當頁面所需的 JS 檔,
避免 User 初次進到首頁時,感覺到網站速度慢的狀態。
LazyLoadingRoutes_前
步驟:
- 先在上方 import 元件
- 在 routes 設定每個 Path,對應的元件
1 | import Vue from 'vue'; |
LazyLoadingRoutes_後
步驟:
- 直接在 routes 設定每個 Path 時,import 頁面元件
1 | import Vue from 'vue'; |
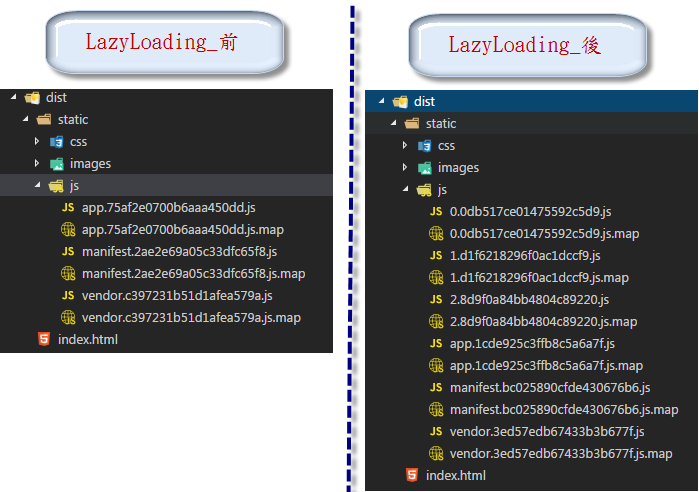
比較圖
由下圖可看出,有無使用LazyLoadingRoutes的差異
- LazyLoadingRoutes_前 → js 檔案共用 3 支。
- LazyLoadingRoutes_後 → js 檔案共用 6 支。
驗證(登入狀態)
檢查 User 是否已登入狀態
範例
在程式碼第22行位置,可以看到 about 的 path,有新增 meta 物件,透過檢查 authorization 變數
1 | /* eslint no-console:off */ |
router 設定 history 模式
Vue router 預設模式是使用 hash,所以當切換網址時,上方網址都會有「#」字號,如下
網址: https://serverPath/#/Page
若想要去掉「#」字號,產生下面的網址的話
網址: https://serverPath/Page
1 | const router = new VueRouter({ |
情境
若我們將模式更新改history時,會產生下列的情形
正常情況下,User 統一會從首頁登入,如下
首頁網址: https://serverPath/
但怕的是 User 直接用網址直接想進去某個頁面,如下
產品頁面: https://serverPath/products
不過這時後端並無相對應的「products 頁面」回傳給前端,
因為頁面的 router 都是寫在「前端邏輯」上,
所以這時後端要協助配合設定「URL Rewrite」,
不管 User 上面輸入什麼網址時,
後端統一回傳「index.html」頁面,
接著讓前端的 router 去導向 products 頁面。
補充說明
後端在實務上應該是在使用者直接輸入網址時,進行你在前面提到的”轉址行為”
因為後端的 Router 通常也包含了 API 路徑,所以正確的狀態是:
- 當使用者直接輸入網址
- AP 主機先跑後端的 Router 發現沒有符合的 Path
- 轉址到前端框架 build 出來的檔案
- 跑前端 Router
- 存在前端 Router 中,渲染對應的前端頁面組件
- 不存在前端 Router 中,轉址到首頁或選擇顯示 404 page